
Every business that invests in DevOps and cloud should have some kind of containerization tool in its technology stack, and the most popular one is Docker. Docker removes the pain of porting an application to different environments, operating systems and machines: it creates a wrapper around the application with predefined instructions on how to run it. It is a standard, so it integrates easily with countless other services such as Kubernetes or Docker Swarm. Let us look at the basics and then start implementing Docker in the DevOps pipeline.
Docker basics
To effectively incorporate Docker into your pipeline, you need:
- Dockerfile - a recipe for how to create a Docker image
- Docker registry - storage for Docker images (Nexus, GitLab Registry, ...)
- Machine running the Docker daemon - where Docker images are executed
- Pipeline - the recommended place to create Docker images
A Dockerfile accelerates and optimizes application deployment. Once a Docker image is created, it can be deployed on any Docker-compatible machine. An example of a basic Dockerfile (a blueprint) running a Python script looks like this:
FROM ubuntu:22.04
COPY . /app
CMD python /app/app.py
Docker first pulls the Ubuntu base image, which serves as the base layer. It copies the content of your application into the filesystem under /app and sets the start command that runs when the Docker image is executed. Every time you run the Docker image and create a Docker container, it performs the CMD (or ENTRYPOINT) code.
Keep in mind that while you can use the same Docker registry for different applications, this does not apply to the Dockerfile: different applications most often have different Dockerfiles.
Beware of the most common pitfall
There are many pitfalls on the way to the best and most optimal Docker image, but let us look at the most common one: a redundantly large Docker image.
Keep the Dockerfile as minimalistic as it needs to be. We often come across a massive Dockerfile that updates the underlying image, downloads multiple libraries in multiple separate RUN commands, and builds the application artifacts on top of that. So what is wrong with it?
- Updating the underlying image. Choose an up-to-date base image, or customize your own, to avoid updating libraries after deployment.
- Chain the RUN commands. Each RUN command adds a new Docker layer and bloats your image size further. With only one RUN command you create only one layer, which reduces the size.
- Building artifacts inside the Dockerfile. Always build artifacts outside of your Dockerfile. The application does not run from the code you write, it runs from the built application (.exe, .war, and so on).
Simple steps such as building the artifacts outside of the Dockerfile definition and building them inside a CI/CD pipeline can save you as much as 90 percent of storage.
Into the pipeline
A general minimalistic pipeline for any kind of application should follow three steps, also called stages in a CI/CD pipeline:
- Build the application
- Build and push the image
- Deploy the application
These steps follow a simple workflow, as if you were running the application on your local machine. First you build the application, which a JavaScript developer will recognize as the dist/ folder where the artifacts are stored. Then you create a Docker image via the Dockerfile mentioned above. This creates a wrapper around the app and makes it platform agnostic. The next step is to push this image to a remote registry, so it can be used either by your colleagues or as a deployment to servers.
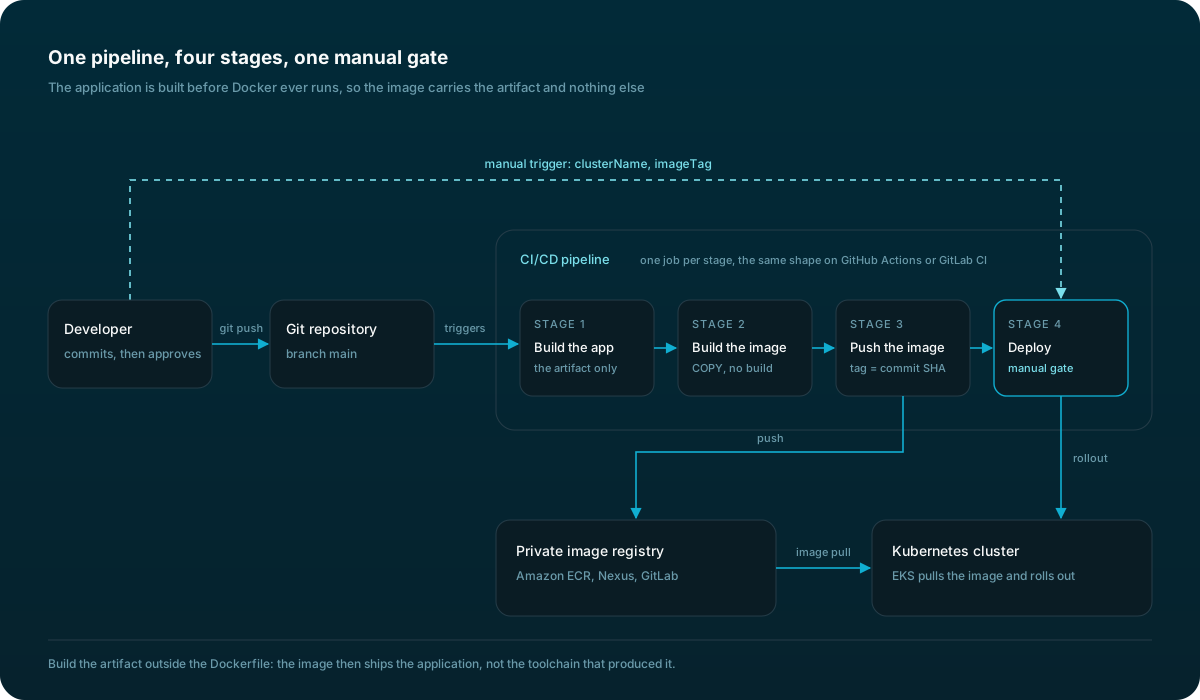
In a pipeline like this, the build stage is taken out of the Docker stage and stands as a separate step. The Docker image is built with only the artifacts of the application and is then pushed to a private Elastic Container Registry. As we do not want the application to be deployed automatically every time, we have added a manual step where the user can trigger the deployment. EKS (Kubernetes on AWS) has access to the ECR, pulls the image from the registry and spins up the application, with no manual steps needed aside from running the job.
So what are the benefits?
The power of Docker and containerization in DevOps is not the technology itself, but the limitless possibilities and integrations we can use once it is part of our workflow. Take, for example, scaling an application on an infrastructure without any form of containerization, and compare it with a Kubernetes infrastructure that has Docker as the underlying engine.
On the infrastructure that lacks Docker, scaling an application (creating more replicas) means manually copying the application to the target machine that handles the replica. Scaling the application down means accessing that target machine once again and deleting the application. During an update, we would need to manually update the code on each target virtual machine, which can be a tedious process.